What is the difference between a wall cabinet and a
kitchen pantry cabinet? If you have seen and used both, you will know that
there is little difference other than their sizes.
You can think of the pantry cabinet as a plywood
box with several shelves and cabinet doors. If you want to build a broom
cabinet, you cannot install the shelves. However, you may wish to install
louvered doors to match the rest of the kitchen.
Let us begin with the most uncomplicated cabinet design – 84-inches x 12-inches x 12-inches.
Here’s what you will need to complete this project –
- Three-fourth inch sanded plywood (4 feet by 8 feet) sheet
- One-fourth inch thick sheet of plywood for the back panel (11.25 inches by 79.5 inches)
- Table saw (attached plywood blade) and dado set
- Finish nailer (1.25-inch finish nails)
- Clamps
- Jigsaw or circular saw
- 3-inch wood screws
- Drill driver
- Combination square
- Level
- Wood glue (preferably water-resistant) and brush applicator
How to build
the cabinet?
Begin by cutting the sides out of the three-fourth-inch
thick plywood sheet.
1. Ensure that the plywood blade on your saw table is about one-inch above it.
2. The face of the fence should be 13-inches from the most nearby edge of the saw table.
3. Put the 4-feet by 8-feet plywood sheet on the
saw table with a long edge against the fence. Turn the saw on and cut a section
13-inch wide by 8-feet long.
4. Cut two identical 13-inch by 8-feet long sections
from the entire plywood.
5. The saw fence should be 11.25-inches from the
blade. Cut an 11.25-inch by 13-inch section from the end of the two strips.
6. Trim them down to 84-inches.
7. Cut a notch, 3-inch deep, and 4-inch tall into each corner of each strip. It should accommodate a toe kick. Use a circular saw or jigsaw for this step.
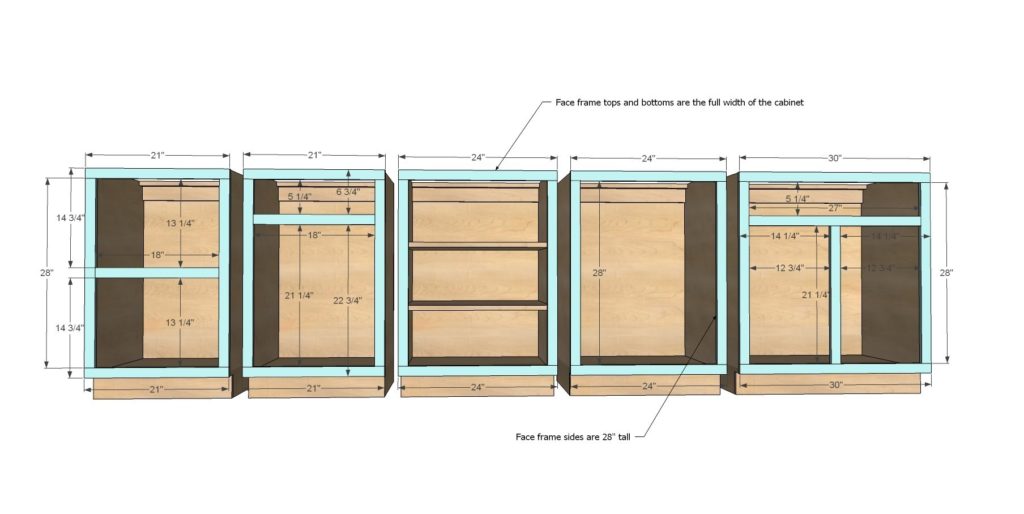
Cut the rest of plywood according to the following specifications –
- Cabinet top: 13 inches by 11 1/4 inches (1)
- Cabinet bottom: 13 inches by 11 1/4 inches (1)
- Shelves: 11 3/4 inches by 10 3/8 inches (5)
- Nailers: 3 inches by 10 1/2 inches (2)
- Divider support brace: 3 inches by 10 1/2 inches (1)
- Toe kick: 4 inches by 10 1/2 inches (1)
Next step
involves shaping the rabbets
Cut the grooves on both side panels, where the top panel will meet the bottom one. Make sure they are on the inside edges only. A rabbet is similar to a dado that lacks a side.
You can check out beginner-level guides for cutting and shaping rabbets and dadoes. Visit Eco Weber Wood Crafts Projects to learn more about cutting rabbets for kitchen cabinets.
The
penultimate step involves assembling the cabinet
1. Once you have cut all the dadoes, it’s time for
assembly. Begin with one side. Cover the dado evenly with glue and position the
bottom plywood into the dado. The rabbeted edge should be facing the cabinet
center.
2. Use the nailer and nails to fix the cabinet
bottom. You will need 3 to 4 nails.
3. Add glue to the first shelf dadoes and toenail
it for stability. Repeat the same for the three other shelves.
4. Place the other cabinet side. The dadoes should
face upwards and add glue to the rabbets and dadoes.
5. Turn the assembly and insert the shelves into
the respective dadoes. Tap the joints into place and toenail them.
6. The nailer should be right under the cabinet top.
It should serve as the anchor of the cabinet, and another should be right below
the first shelf.
7. At the cabinet bottom, nail the toe kick. Insert the cabinet back panel (one-fourth-inches) into the rabbets. Installation is quite simple. Place it against the wall and attach it using the wall studs through the nailers at the back of the cabinet.
Installation is quite simple. Place it against the wall and attach it using the wall studs through the nailers at the back of the cabinet.