Ensuring access to clean, contaminant-free water is vital for the health and well-being of your household. A water filter provides a reliable solution by effectively removing your tap water’s impurities, odors, and unpleasant tastes. Installing a water filter under the kitchen sink not only ensures that you and your loved ones have access to clean drinking water but also adds an extra layer of protection and convenience to your daily routine.
This guide will walk you through the step by step process of safely and effectively installing a water filter under your kitchen sink. This will allow you to enjoy the peace of mind that comes with having pure, great-tasting water at your fingertips.
Water filtration systems for beneath the sink
Installing a water filtration system beneath the sink is a simple process that can enhance your home’s water quality. Single-stage filtration systems are the most popular option and can successfully filter out most particles. These systems usually require a small filter that only needs to be replaced twice a year. However, some two—or three-stage filters may have two or three canisters or an added tank. There are some common options when choosing a filter.
- Activated carbon filters: These work by removing contaminants from water through a process called adsorption. They are known for removing unpleasant odors and improving water taste.
- Kinetic degradation fluxion filters: These use a high-purity copper-zinc alloy to remove contaminants. They are known for their ability to remove heavy metals, like mercury and lead, from water.
- Ion exchange filters: They replace ions from contaminant particles with ions that don’t harm health. These filters are effective at removing dissolved metals, such as lead and copper.
- Reverse-osmosis filters: These use a membrane to remove impurities from water. This process filters out most dissolved salts, minerals, and heavy metals from water.
While these steps are specifically for single-stage filtration, the installation process typically applies to different filters. It is important to follow the instructions provided by the manufacturer or ask for the help of a professional plumber.
Gather the necessary tools and materials
Before starting the installation, ensure you have all the tools and materials ready for a smooth process. You will need:
- Water filter unit
- Tubing
- T-fitting
- Wrench and screwdriver
- Bucket or towels
1. Turn off water supply
Before beginning the installation of your water filtration system, it is crucial to turn off the water supply to your kitchen sink. Start by locating your home’s main water shut-off valve, found near the water meter or where the main water line enters the house. Once you have identified the valve, carefully turn it clockwise to shut off the water flow specifically to the kitchen sink area.
Ensure the water supply is switched off before proceeding. This will lessen the risk of leaks or water damage during the installation process.
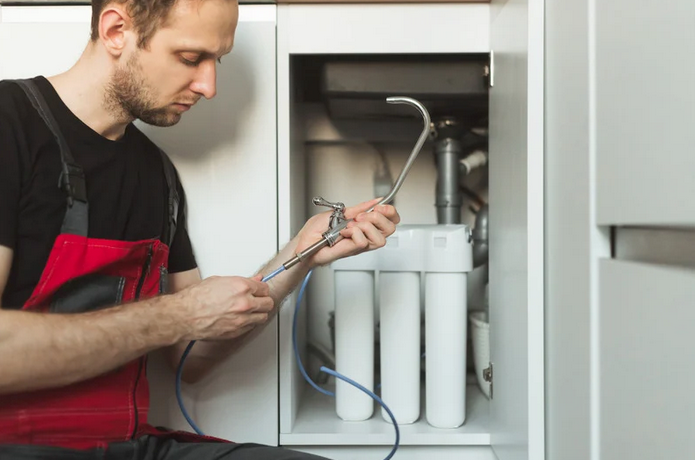
2. Mounting the water filter unit
When mounting your single-stage water filter unit beneath the kitchen sink, choosing the right location ensures easy access for future maintenance is essential. Select a spot within the cabinet where the unit can be installed securely and where the cartridge replacement will be convenient. Next, firmly mount the filter unit to the cabinet wall using the provided brackets or mounting hardware. Ensure that the unit is stable and at a level that prevents any potential issues in the future.
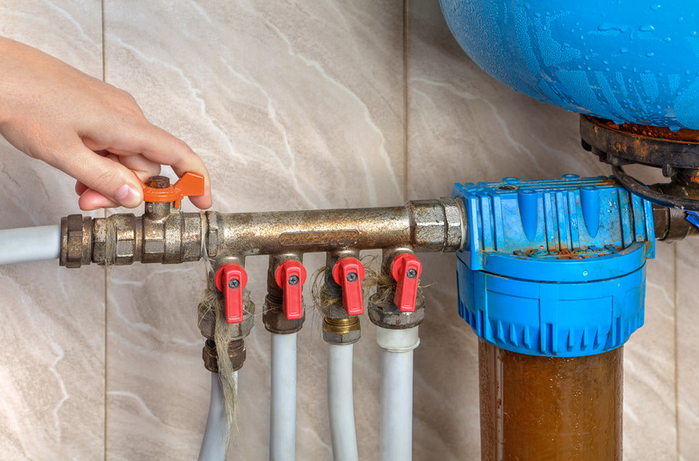
3. Tee-fittings installation
When setting up your single-stage water filter, tee fittings play a pivotal role as linking points between the current water supply line and the filter unit. Choosing the right size and type of tee fittings is essential to guarantee a secure and tight connection. Make sure to wrap the threads with Teflon tape before attaching the wrench to avoid leaks in the fittings.
Moving forward, carefully fasten the tee fittings to the existing water supply line under your kitchen sink, ensuring a tight seal to prevent leaks. It’s essential to double-check the connections for security before proceeding with the installation process to ensure a hassle-free setup.
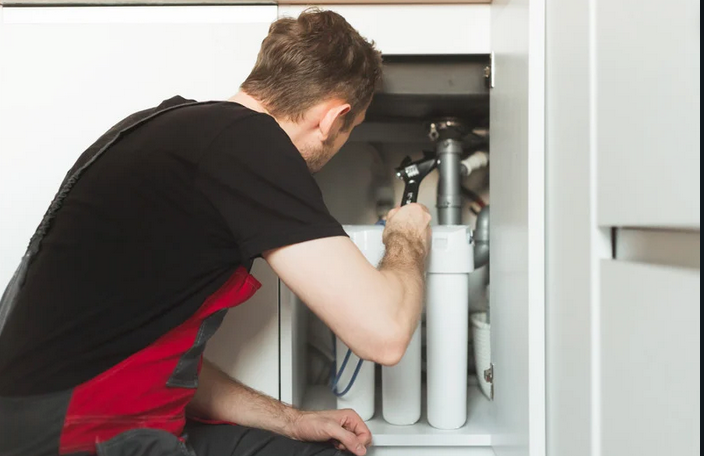
4. Installing the water lines
As you progress in the installation process of your single-stage water filtration system, it’s time to focus on seamlessly integrating the water lines. Follow these steps for a successful installation:
- Begin by connecting the water filter unit to the tee-fittings securely, ensuring a snug and leak-free connection.
- Carefully measure and cut the tubing to the appropriate length, considering the distance required to reach the tee fittings and the filter unit.
- Once the tubing is cut to size, securely fasten it to the fittings and the filter unit, confirming that all connections are tight and leak-free to maintain the optimal water flow through the filtration system.
5. Faucet connection
In order to complete the installation of your single-stage water filter system, it is essential to install a dedicated faucet to access your filtered water. Choose a suitable location near your kitchen sink for easy convenience. Once the faucet is securely in place, proceed to connect it to the filter unit using the provided fittings.
This connection will ensure a seamless flow of purified water straight from your filter, providing you and your household with a convenient and reliable source of clean drinking water.
6. Wrapping up
After completing the faucet connection, it’s important to release the pressure and check for any potential leaks to ensure the successful installation of your single-stage water filter system. Slowly turn on the water supply and let it run for approximately five minutes to allow the filter to flush and remove any air from the system.
Next, carefully inspect all connection points for leaks and address any issues promptly. By diligently conducting this final check, you can guarantee the optimal performance of your water filtration system.
Author bio

Cecil A. Palmer is a blog contributor for Showtime Plumbing LLC, focusing her sharp wit on your worst plumbing nightmares. She deftly pens articles aimed at keeping your pipes in check, sparing you from the chaos of unwelcome waterworks. Through her work with SpringHive Digital Marketing Agency, Cecil crafts compelling copy for various Plumbing Service clients, blending technical savvy with relatable anecdotes. Nestled in the heart of Tennessee with her husband and two little ones, she unwinds by exploring the great outdoors and immersing herself in the world of gardening and amateur photography.