Description
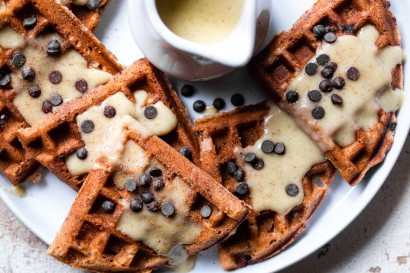
Vegan gluten-free waffles with “eggnog” cream sauce—a delicious, make-ahead Christmas breakfast that’s healthy, too!
Ingredients
- 2 Tablespoons Apple Cider Vinegar
- 2-½ cups Light Canned Coconut Milk, Divided
- 2-½ cups Almond Flour (240g)
- 1-½ cup Tapioca Starch (180g)
- 1-½ cup Applesauce, Divided
- 6 Tablespoons Coconut Oil, Melted
- 8 teaspoons Baking Powder
- 2-½ teaspoons Ground Nutmeg, Divided
- 2 teaspoons Cinnamon
- 1 teaspoon Salt
- ¼ cups Enjoy Life Foods Mini Chocolate Chips, Plus Additional For Topping
- 3 cups Almond Milk Eggnog
- ½ cups Raw Organic Cane Saugar
Preparation
Place apple cider vinegar into a large measuring cup and fill with coconut milk until it reaches 2 cups. Whisk and set aside for 10 minutes.
After 10 minutes, add mixture into a blender. Add almond flour, tapioca starch, 1 cup of applesauce, coconut oil, baking powder, 2 teaspoons nutmeg, cinnamon and salt. Blend until smooth and creamy, stopping to scrape the sides down as necessary. Remove 1/2 cup of the batter and set it aside. Pulse in chocolate chips. Let remaining batter rest while you begin the sauce.
Mix remaining 1/2 cup coconut milk with almond milk egg nog in a large clear microwave safe bowl. Clear is important, as you’ll need to see when the sauce boils. Remove 1/2 cup of the liquid and set it aside.
Microwave mixture until it just begins to boil, about 7–8 minutes depending on the strength of your microwave.
While the liquid boils, whisk reserved batter and milk mixture that you set aside. Add sugar, remaining 1/2 cup applesauce, and 1/2 teaspoon nutmeg. Whisk until well mixed.
Once milk has started to boil, remove from the microwave and immediately pour in the batter mixture, whisking until well combined. This is where it gets a bit tricky (see note). You need to microwave it until it begins to boil, then microwave it for 1 more minute once boiling. My batter boiled at 5 minutes, so I cooked it 6 minutes. Then stop and stir.
Repeat this process 4 more times, watching the sauce to see when it boils and then cooking 1 more minute. (My sauce took 1 1/2 minutes to boil each round, so I cooked it for 2 1/2 minutes. It looked like this: Cook 6 minutes. Stir. Cook 2 1/2 minutes, stir. Cook 2 1/2 minutes, stir. Cook 2 1/2 minutes, stir. Cook 2 1/2 minutes.)
Remove sauce from microwave and let stand for 10 minutes to thicken, stirring every so often so that it doesn’t develop a skin over the top.
I usually begin cooking the waffles when the sauce is microwaving, and then keep them in the oven to stay warm (they will lose some crispness this way though, just to be warned.) Spray waffle iron with coconut oil spray and heat it on the highest setting (note that I have a classic waffle maker, not Belgium!).
Ladle in 1/2 cup batter. Cook until waffle maker stops steaming. Check, and if you want them crispier, cook them a few more rounds. I did ours another 2 to 3 rounds (or a total of about 3 minutes) until nice and crisp.
Douse the waffles with sauce and additional chocolate chips and devour!
Notes:
• As with all gluten-free baking, please weigh flours to ensure results.
• It may take some time for you to master the cooking time here. But, once you get it, it’s totally worth it!
• You can make the batter and sauce the night before (you can choose to cook the sauce ahead of time or not) and then just cook the waffles in the morning.


