Description
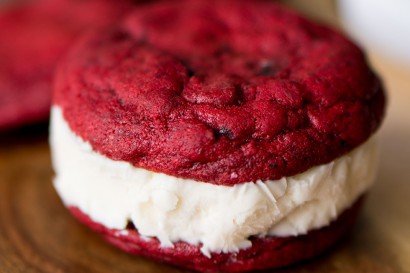
Red velvet ice cream sandwiches are what dreams are made of: smooth and rich cream cheese ice cream sandwiched between two chewy and moist red velvet cookies. You’ll want to make extra to store in the freezer so you can eat them forever.
Ingredients
- FOR THE CREAM CHEESE ICE CREAM:
- 8 ounces, fluid Cream Cheese
- 1 cup Sour Cream
- ½ cups Half-and-half
- ⅔ cups Granulated Sugar
- ⅛ teaspoons Salt
- 1 teaspoon Vanilla Extract
- FOR THE RED VELVET COOKIES:
- 1-½ cup All-purpose Flour
- 2 Tablespoons Cocoa Powder
- 1-½ teaspoon Cornstarch
- ¾ teaspoons Baking Soda
- ¼ teaspoons Salt
- ½ cups Butter, Softened
- ⅓ cups Brown Sugar (lightly Packed)
- 1 Egg
- 1 teaspoon Vanilla Extract
- 3 teaspoons Red Food Coloring
Preparation
For the cream cheese ice cream:
In a stand mixer or food processor, beat/process the cream cheese until smooth and slightly lightened, around 1–2 minutes on medium-high speed for mixer, and 30 seconds on food processor. Add sour cream, half-and-half, sugar, salt, vanilla extract, and blend until smooth (medium-low speed on mixer).
Chill thoroughly in the refrigerator for 1–2 hours. Freeze in your ice cream maker according to the manufacturer’s instructions.
For the red velvet cookies:
Whisk flour, cocoa powder, cornstarch, baking soda, and salt together in a large bowl.
In a separate large bowl, beat butter and sugar on medium-high speed until light and fluffy. On medium-low speed, mix in egg and vanilla extract. Scrape down the sides of the bowl, and slowly mix in food coloring. Add additional food coloring if needed for desired color.
On low speed, mix in the flour mixture, half at a time. Refrigerate the dough for at least 1 hour.
Preheat oven to 350ºF. Line cookie sheets with either parchment paper or a silicone mat. Form dough into balls around 2-tablespoons in size (I used a small tablespoon-size ice cream scoop). Place onto the cookie sheets, leaving 2 inches apart between them.
Bake for 7–9 minutes. Take them out when they’re slightly puffed and just set- they will continue to set as they cool. I usually leave the whole pan on the cooling rack for a minute or two, and then take the sheet out and leave the parchment paper or silicone mat on the rack to let them finish cooling.
Sandwich together and enjoy! You can wrap these individually in plastic wrap and they’ll keep well in the freezer for at least a month—probably longer although they didn’t last that long here.